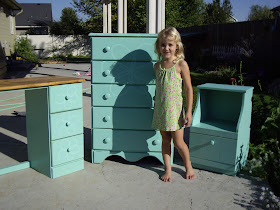
Someone (possibly Adam or Eric?) had used a permenant marker to fairly separate the drawers. I loved the little waves at the bottom, and hoped I could change it into something cute!
I found some mistinted Zissner primer for $5 that almost perfectly matched my Woodlawn Charm color.
After I sanded, I painted on a coat of the primer. It's oil-based and pretty smelly! I sanded again before painting on the Woodlawn Charm. I only needed one coat because the primer and paint matched soooo well!
I had seen dressers with a stencil painted across the front and thought I would do my own version. I didn't have a stencil, but my "design" ha ha was quite simple, so I just freehanded it. Here is how it turned out:
I used a piece of chalk to draw the flower. This works great because if you don't like what you have drawn, just wipe it off with a damp cloth and start over! I added a bit of white to some of the Woodlawn Charm to lighten it up, then used a small paint brush and brushed it right over the top of the chalk. After the design dried, I just wiped off the remaining chalk with a damp cloth. Easy Peasy!
Next I distressed the edges with an 80 grit sandpaper. Then I took a piece of 220 grit and went over the distressed edges again with it. It takes a little extra time, but the distressed edge just looks a little more natural and rubbed in.
After that, it was 2 coats of Minwax Wipe-On Poly~
I lined the drawers with some super cute coordinating paper I found at Hob Lob.
I also had a desk that I found previously at a yard sale.
I gave it the same treatments as the dresser~
I used my chalk and lightened paint to make the flowers~
I also lined the desk drawers just like the dresser~
I finished this nightstand I found at my favorite thrift store like the other 2 pieces to complete this set. Here is the before~
...and after!
I added some little flowers and swirlies~
and, of course, lined the drawer.
Here are all 3 pieces together. I sold them as a set.
This is my little Maya!


Very cute pieces. I love how subtle the flowers on the front are.... :)
ReplyDeleteOh, what a darling set!
ReplyDeleteSo cute! I would love to have you link up over at Sassy Sites for our Trash to Treasure Tuesday party! :)
ReplyDeleteMarni @ Sassy Sites!
www.sassysites.blogspot.com
Very cute, they make a great set!
ReplyDeletehttp://thecraftinme.blogspot.com/
Hi Kim and thanks so much for your kind comments on my blog, that is so cool that you have been to NZ and bungy jumped! I am far too chicken to do that, lol. I had to come and check out your blog, your blog name had me hooked in an instant, and your transformations, WOW...I am now your newest follower :)
ReplyDeletexx Karen
SO cute! I love it! The flower is perfect!Visiting from allaboutmommies.blogspot.com
ReplyDeleteCamille
Adorable! I love the detail of the flowers!
ReplyDeleteLooks ideal for a girly room! I love this set, you did a great job!
ReplyDeleteYay! I love this! Super cute addition of the flower details.
ReplyDeleteI love everything about these pieces! The color, the paper, the flower! Wow!!!
ReplyDeleteBeyond cute! You did an awesome job!!! Love the flowers!!
ReplyDeletethis set is just adorable!!! the flowers really make it, and the lines drawers sre so fun. thanks for joining my party!
ReplyDeleteI love the way they came out. Where did you get the paper that you lined the drawers with?
ReplyDeleteAdele
I love that you took all the pieces and made a set. What a lucky little girl who got these! The colour is perfect! I wonder how Eric and Adam would feel seeing their dresser so girly now!
ReplyDeleteAdele,
ReplyDeleteThe paper is from Hobby Lobby! :)
The whole set look so good! I LOVE finding old furniture that needs work and making it pretty again! I would love it if you would link up at my link party too!
ReplyDeletehttp://polkadotsandpizza.blogspot.com/
THAT IS BEAUTIFUL!!!!!
ReplyDeleteSo, let me ask you to join in, AS WE ARE REALLY KEEN ON PROMOTING RECYCLED ART:
Come link up your tutorial article on our website & our readers can find you also: http://www.finecraftguild.com/diy-tutorial-linky-party-16/
We'd love to show your work,
Rose
ps when you 'follow the rules' and create a link back from your website/article, you can easily find us again and come back week after week with new craft DIY tutorials.
What an adorable set for a little girl. Love the color!
ReplyDeleteYou are doing some wonderful stuff! I love this set. I am a new follower!
ReplyDeleteThis set is adorable! So sweet!
ReplyDeletea beautiful dresser adn the turquoise color looks too good, you have done it very nicely and it would also serve you for a long time, great find i would say - AboutCabinets Blog
ReplyDeleteOM goodness, what simply charming makeovers! Thanks for sharing at Beyond the Picket Fence's Under $100 linky party.
ReplyDelete